Friday, January 31, 2014

Silly Bird Punch Art Birthday - FM145

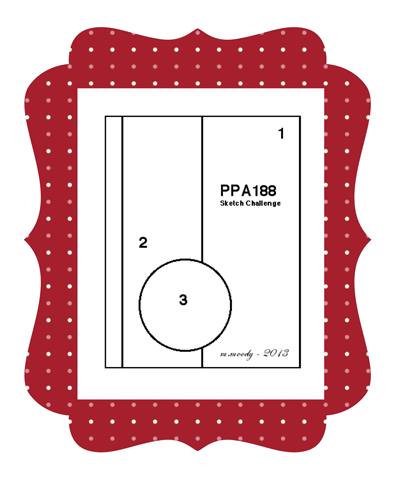
This week over at Friday Mashup Sara has created a fantastic sketch for us. 

Here is the challenge over at The Friday Mashup this week:


1. Create a project with the sketch above
2. Create a project using sponging
3. Mash it up and create a project with the sketch above and use sponging

The moment I seen the sketch and her challenge I knew I wanted to make a punch art card. I went straight to Pinterest to find a punch art animal to CASE and found this fantastic bird from Kim Score

Here is what I came up with. 

I took some extra photos at different angles, I would love to get your feedback. Is the first photo enough, or do you like the additional photos as well?


Stampset: Teeny Tiny Wishes
Paper: Crumb Cake, Early Espresso, Very Vanilla, Basic Black, Island Indigo Core'dinations, Pool Party Core'dinations, Summer Starfruit Core'dinations
Ink: Island Indigo, Pool Party, Summer Starfruit, Crumb Cake, Early Espresso
Punches: Owl Builder, Boho Blossom, Two Step Bird Builder, 1-1/4" Circle, 1-3/8" Circle, 3/4" Circle, Itty Bitty Punch Pack, Ornament (retired), Modern Label, Word Window, 
Tools: Sponges

Wednesday, January 29, 2014

Many Thanks Catalogue CASE

As you will be able to see with my future posts I have been on a roll with my creations. 

I found inspiration from Stampin' Up!'s catalogues. Up until a little while ago I have only used the catalogues to see the items they have for sale. Now I have been flipping through the catalogues look at the cards and finding out how I can take the layouts they used and spin it to use the supplies I already have. 

These cards are CASED from a card in the current Catalogue on page 36. 

Using the photopolymer stamp set made making this card super easy!!!


Stampset: Another Thank You Photopolymer
Paper: Crushed Curry, Bermuda Bay, Whisper White, Eastern Elegance DSP
Ink: Crushed Curry, Bermuda Bay
Punches: Bitty Butterfly, Elegant Butterfly
Bigshot: Square Framelits, Arrows Embossing Folder, Woodgrain Embossing Folder
Accessories: Basic Rhinestones

Tuesday, January 28, 2014

Mini File Folder Tutorial

I made a mistake! 

I scheduled this post for next Monday but I thought I scheduled it for yesterday. Oppps, I'm so sorry!

Below is a photo tutorial of how I made the Mini File Folder of my other Paper Pumpkin Cards found here

It is super simple and I love using it on cards!


Here is a card finished with the folder from the October My Paper Pumpkin Kit.


Here is a card finished with the folder I created.


The folders look very similar don't they?

Friday, January 24, 2014

FM144 Gold Thank You Set

Today at Friday Mashup we have another fantastic challenge by Lisa. She really put me to the test with this challenge. I decided to make 3X3 note cards.


1. Create a project with "Stars"
2. Create a set of "Thank you Cards with Matching Envelopes"
3. Or Mash it Up and create  a set of "Thank you Cards & Envelopes using Stars"

It seems my favourite thing to do when I make 3X3 note cards is to make a background out of wash tape. Since I don't have the gold foil paper from Stampin' Up! I embossed paper with gold embossing powered and then I used my big shot and holiday framelits (retired) to cut out the small stars.

I also embossed my thank you sentiment and cut it out. 

I used the envelope punch board to make the envelopes, it is simple just follow the directions on the board. To get the gold stars on the envelopes I used Stampin' Dazzle Gold marker on my stamp and quickly stamped on the envelopes. To finish off the envelopes I used a piece of washi tape to keep the envelope closed. 


Stampset: Hello, Lovely
Paper: Very Vanilla
Ink: Versa Mark
Bigshot: Holiday Collection Framelits (Retired)
Tools: Heat Tool, Gold Embossing Powder, Paper Snips, Envelope Punch Board
Accessories: Watercolor Wonder Designer Washi Tape

Wednesday, January 22, 2014

Wahoo My Paper Pumpkin Kit Part 2

As I mentioned on Monday These are the second set of cards I created using my October My Paper Pumpkin Kit. 

I love to take the supplies they give us and cut all the cards in half. Cutting a 1/4" off the top and side of the card gives you a nice frame to mount on a 4-1/4"X5-1/2" piece of card stock. This makes the kit stretch a lot further. 

My cards below are fairly similar. First I started by putting the Washi tape directly onto the brown paper. I didn't think the tape looked quite right.


So for my next card I put the tape on a strip of whisper white card stock and then adhered it to my card. Looking better.

Also for this card, I ran out of the white file folders from the kit. So, I figured out how to replicate it using the Envelope Punch Board. On monday I will give you a photo tutorial on how to make the folder. It really is quite simple.


For my next card I wanted to see what it would like if the washi tape had a border on the left and right side. I was happy with it but still liked the card above better. 

In an attempt to make a masculine card I got rid of the butterflies and added some twine and a button from the kit. What do you think, masculine enough?


Stampset: Lots of Thanks, Papillon Potpourri, Happiest Birthday Wishes (Retired), Wahoo My Paper Pumpkin
Paper: Whisper White, Coastal Cabana, Cards from October Paper Pumpkin Kit
Ink: Coastal Cabana, Tangerine Tango, So Saffron
Punches: Bitty Butterfly
Accessories: Buttons and Twine from My Paper Pumpkin Kit, Basic Rhinestones

Monday, January 20, 2014

Wahoo My Paper Pumpkin Kit Part 1

Before we get to my cards today I just wanted to inform you I am going to try to post every Monday, Wednesday and Friday. I hope by telling you this you won't be frustrated when I don't post on the other days of the week.

Last week I got together with my mother and sister to Scrap and Skype and we decided to create with the Wahoo Kit we received back in October. As usual I like to make at least one card the way it was intended but then create some cards out of the box.

Since we are creating months after the kit was sent to us there were some great ideas pinned on Pinterest. Below are cards I cased from others. Wednesday I will share with you the cards I made with the other half of the kit.

Original Design from Kit

 This card was cased from Valerie Duram

Stampset: Delightful Dozen, Good Life My Paper Pumpkin
Paper: Real Red, Silver Glimmer, Whisper White
Ink: Basic Black, Real Red
Punches: Heart
Bigshot: Hearts a Flutter Framelits


This card was cased from Mercedes Weber

Stampset: Delightful Dozen
Paper: Basic Black, Tangerine Tango, Whisper White
Ink: Basic Black, Tangerine Tango
Punches: 1" Square, 1" Circle, 1-3/8" Circle, Owl Builder
Accessories: Bakers Twine from Wahoo Kit

This card was cased from Heather Heroldt

Stampset: Wahoo My Paper Pumpkin, Happiest Birthday Wishes (Retired), 
Paper: Whisper White, Midnight Muse, Cajun Craze, Old Olive
Ink: Midnight Muse, Cajun Craze
Punches: Owl Builder
Accessories: Button and Twine from Wahoo Kit

Sunday, January 19, 2014

Owl Get Well Wishes PPA188

My sister and I are both sick and our misery together inspired me to create this card. I don't know if the Owl and the sentiment go together but it is exactly how I was feeling. I never knew my feelings could be expressed in my cards. 

I am going to be sending this card to my sister and since she loves Owls I know this card will brighten her day. 


The sketch I used to inspire this card was from Pals Paper Arts.


I couldn't decide which layout I liked better, what do you think?


Update: In my hast in getting this posted I forgot to give credit to Diana Gibbs for the original punch art owl inspiration. You can find her blog post here.

You can also follow me on pinterest to find many more punch art ideas.

Stampset: Teeny Tiny Wishes
Paper: Whisper White, Coastal Cabana, Crushed Curry, Smokey Slate
Ink: Coastal Cabana
Punches: Word Window, Owl Builder Punch, Two Step Bird Builder, Scallop Edge Boarder
Bigshot: Chevron Embossing Folder, Perfect Polka Dots Embossing Folder, Starburst Framelits, Circle Framelits, Window Frames Collection Framelits
Tools: uni-ball Signo Gel Pen

Saturday, January 18, 2014

Friday Mashup FM143

I apologize today's post is late. I have been fighting a flu and so I have spent the last few days sleeping hoping I will recover quicker.

Since Valentines Day is coming up quickly we have a fantastic challenge at Friday Mashup that will help you get prepared in advance.

  1. Create a project using the Colors "Coastal Cabana, Real Red & Crumb Cake."
  2. Create a project using "Hearts & Arrows. "
  3. Or Mash it Up and create a project using "Coastal Cabana, Real Red & Crumb Cake along with Hearts & Arrows."

I love the colour combination, it is so trendy right now. 

I created my background with Washi Tape. It is a simple but fun way to create a background and I always love how it turns out.


Stampset: Perfect Pennants
Paper: Whisper White, Coastal Cabana, Crumb Cake, Real Red
Ink: Coastal Cabana, Real Red
Punches: Owl Builder
Bigshot: Banners Framelits
Accessories: Whisper White Bakers Twine, Retro Fresh This and That Designer Washi Tape

Friday, January 10, 2014

FM142 Flower Birthday

Today's challenge at Friday Mashup seemed like it would be a simple one. However, no matter how many cards I ended up creating they never mashed both challenges. It was  with my 4th card that I was finally able to do both challenges. I was not completely satisfied with my first card that mashed both challenges as I found it bland and needed something more. This lead me to create version two. I added spritzing to the background and sponged the edges of the flower. I am happier with the card but it is still not my best work.

The challenges over at Friday Mashup this week was to:
1. Create a project with Twine
2. Create a Birthday Themed Project
3. Mash it up and create a Birthday Themed project with Twine


Here is Version 1 of my card


Here is Version 2


Each layer of my flower has been popped up with dimentionals, along with the sentiment.

Stampset: Create a Cupcake
Paper: Whisper White, Rich Razzleberry, Bermuda Bay
Ink: Rich Razzleberry, Bermuda Bay Ink, Bermuda Bay Marker
Punches: Decorative Label
Bigshot: Floral Frames Framelits
Tools: Spritzer Tool, Sponges
Accessories: Whisper White Bakers Twine, Bermuda Bay 1/8" Taffeta Ribbon, Brights Designer Buttons (Retired)
Other: Wooden Skewer

Monday, January 6, 2014

Cheese Giggle Greetings Card

Here is the second card I created using the inspiration I received from Tami White's fantastic card.

Cards made with this stamp set don't stay in my suitcase of cards for very long. They are always the first to sell or the ones I gravitate to give to someone. Everyone needs a laugh about their birthday, especially if they are sad about aging. I love this card stamp because it tells them that age doesn't matter, unless they are a cheese! :D

Have a fantastic day!!!


Stampset: Giggle Greetings
Paper: Midnight Muse, Primrose Petals Core'dinations, Whisper White
Ink: Staz on, So Saffron Marker, Daffodil Delight Marker, Pumpkin Pie Marker, Primrose Petals Marker, Midnight Muse Marker
Bigshot: Deco Labels Framelits, Houndstooth Embossing Folder
Accessories: Midnight Muse 3/8" Stitched Satin Ribbon, Basic Rhinestones, Sanding block

Sunday, January 5, 2014

Cat Giggle Greetings Card

I loved this stamp set from the moment I seen it. I haven't used it much yet but when I seen the card Tami White created I knew I had to create something similar.

I will share another similar card tomorrow. It is fantastic how versatile the framelits are! I haven't stopped using my big shot from the moment I got it.  


Stampset: Giggle Greetings
Paper: Midnight Muse, Primrose Petals Core'dinations, Whisper White
Ink: Staz on, So Saffron Marker, Daffodil Delight Marker, Pumpkin Pie Marker, Primrose Petals Marker
Bigshot: Circle Framelits, Starburst Framelits, Chevron Embossing Folder
Accessories: Summer Starfruit 3/8" Stitched Satin Ribbon, Basic Rhinestones, Sanding block

Saturday, January 4, 2014

Pendant Notes Card Set

Another late post, but better late than never.

Over the last few days I have been organizing and cleaning my house. There were some rooms that have been neglected for quite some time and were calling to be organized. One which was my craft room. I have found a lot of items which I forgot I had. 

I picked these gems up from the clearance rack a few years ago and never did anything with them. I cannot wait to make more card sets similar to these. They are perfect for a small gift for someone and very easy to create.

Have a look at Stampin' Up's clearance rack. They have some great kits on sale, although they are not the same as these cards they make creating very simple.


Stampset: Another Thank You Photopolymer Stamps
Paper: Pendant Notes (Retired 2011), 6X6" Patterns Pack (retired)
Ink: Early Espresso
Accessories: Naturals Designer Buttons, Basic Pearls, Linen Thread, Ribbon Slides (retired), Hodgepodge Hardware Embellishment Kit (retired), Early Espresso Quilted Satin Ribbon, 1/4" Very Vanilla Grosgrain Ribbon, 5/8" Early Espresso Satin Ribbon

Friday, January 3, 2014

Happy New Year! FM141

The sketch by Cindy at Friday Mashup is fantastic this week! I love how my card turned out. Here is the challenges from Friday Mashup this week:


1. Create a project with the Sketch
2. Create a project using the theme of time
3. Mash it Up and create a project using the sketch and the theme of time


Stampset: Itty Bitty Banners, Embellished Events
Paper: Basic Grey, Real Red, So Saffron, Whisper White, I Am Me DSP
Ink: Pool Party, Real Red
Punches: Word Window
Bigshot: On Film Framelits (I extended the length of the arrow)
Accessories: Basic Rhinestones

Thursday, January 2, 2014

Cherry Giggle Greetings Card

I almost forgot to post a card today! 

I really like the new framelits coming out tomorrow in the occasions catalogue! I think they make it very easy to make a card.

I am sure you will see many more cards with this very same layout in the future.


Stampset: Giggle Greetings
Paper: Gumball Green, Whisper White, Brights (Real Red) Designer Series Paper Stacks
Ink: Staz On, Real Red, Early Espresso
Bigshot: On Film Framelits
Accessories: Simply Pressed Clay, Buttons Simply Pressed Clay Mold, Blender Pen, Early Espresso Bakers Twine

Wednesday, January 1, 2014

Happy Birthday - Seize the Sketch

Sometimes you make cards you love and other days you make cards you aren't too happy with. Today is one of those days! I loved this sketch I pinned from Seize the Sketch but trying to translate it to a card proved to be more difficult than I thought.

You can view the sketch on my Pinterest board "I Love Card Sketches".

My post has to be short today because I have to get my house back to normal after yesterdays festivities.

I hope you all have a great day.

Happy New Year!

May the best of 2013 be the worst of 2014!!!


Stampset: Itty Bitty Banners
Paper: Coastal Cabana, Baked Brown Sugar, Whisper White, Strawberry Slush Core'dinations
Ink: Coastal Cabana
Punches: Hexagon
Bigshot: Houndstooth Embossing Folder
Tools: Sanding block
Accessories: Basic Rhinestones, Whisper White 3/8" Taffeta Ribbon