Monday, September 30, 2013

Washi Washi Washi Halloween Close up Part 2

It is very crazy how fast a weekend can go by. It feels like I blinked and I am heading back to work. It went by so fast I cannot even remember what I did this weekend.

I hope you all had a great weekend!

Here is the last of the close up's for my 3X3 Halloween washi note cards. 


Stampset: Teeny Tiny Wishes
Paper: Basic Grey, Very Vanilla, Basic Black, Whisper White, Pumpkin Pie, Old Olive
Ink: Pumpkin Pie
Punches: Owl Builder, 1/2" Circle, 1" Circle, Large Oval, Word Window, Petite Pennants Builder, Retired Oval, 
Accessories: Witches Brew Designer Washi Tape, Uni-ball Signo Gel Pen

Friday, September 27, 2013

Best of Greetings - You Made My Day

Last night I got to "Scrap and Skype" with my Sister and Mother. Since my sister lives in Ontario and my Mom and I live in Alberta we set a time, atleast once a month to chat and create.

My Paper Pumpkin has been great because all ofus get a kit and we can all create without needing a lot of supplies. It is neat to see how my mom and sister put a spin on the cards. They are so creative!!!!

I love to be able to spend the time with them both and catch up with my sister. It seems we often get caught up in our lives and lose touch.

I am dedicating this card to my mom and sister because "Scrap and Skyping" with them Made My Day!!!


Stampset: Best of Greetings, Happy Day
Paper: Basic Black, Whisper White, Daffodil Delight, Melon Mambo, Bermuda Bay
Ink: Basic Black, Versa Mark
Bigshot: Squares Collection Framelits, Magnetic Platform
Tools: 3/16" Corner Punch, Heat Tool, Whisper White Embossing Powder

Thursday, September 26, 2013

My Niece's Minnie Mouse Birthday Card!

Last weekend we celebrated my Niece's 3rd Birthday. She was so cute all dressed up in her Minnie Mouse Costume!!!

I knew I had to make a Minnie Mouse Card because that was the Theme for her party. She loved the card and actually posed for a picture with the card. I will cherish that card forever. It is a reminder to me that making cards puts a smile on people's faces.

Some time in the near future I will show you my 8X8 punch art cheat card for Minnie Mouse, because I don't have a picture of it right now.


I cased my Minnie Mouse from Sharron White. Unfortunately she is no longer a demonstrator and isn't selling her tutorial for her Disney Characters any longer. I did the best I could to copy what she did just by looking at the photo. As I mentioned I will share my cheat sheet in the next while.

To see all my latest ideas and pins you can follow me on Pinterest here. I have lots of great ideas and I try to keep things fresh!

Stampset: Petite Pairs
Paper: Basic Black, Whisper White, Pink Pirouette, Brights DSP Stack
Ink: Melon Mambo, Basic Grey
Punches: 1/2" Circle, 1" Circle, 1-3/8" Circle, 2-1/2" Circle, Extra-Large Oval, Large Oval, Scallop Edge Border, 1-1/4 Scallop Circle
Tools: Scissors, Stamping Sponges
Accessories: Retired Scalloped Dotted Melon Mambo Ribbon

I also have to share with you this fantastic cake my Niece's mom made for her Birthday. She is extremely talented!!! Plus the cake tasted amazing!!!!


Wednesday, September 25, 2013

Washi Washi Washi Halloween Close Up

What a relief it is to have my class presentation over with. I think it went fairly well but as predicted my voice got extremely shaky. I just hope everyone was able to understand what I was saying. Unfortunately I won't know how well we did until the end of the class. My teacher said he won't grade us until everyone has presented. Do you think that is fair? I don't, I am worried he will compare us to everyone else and they will have had a lot more time to prepare than we did.

As promised here are some closer up photos of the 3X3 Halloween Washi cards I made a week or so ago. These cards were chosen as runner up in the Friday Mashup challenge.

Make sure to keep coming back because I will have the other cards for you. 

I will also have a very exciting announcement to tell you about October 1st so stay tuned for that as well!!!

Stampset: Teeny Tiny Wishes
Paper: Basic Grey, Very Vanilla, Basic Black, Whisper White, Pumpkin Pie, Old Olive
Ink: Pumpkin Pie
Punches: Owl Builder, 1/2" Circle, 1" Circle, Large Oval, Word WIndow, Petite Pennants Builder, Retired Oval, 
Accessories: Witches Brew Designer Washi Tape, Uni-ball Signo Gel Pen

Monday, September 23, 2013

Friday Mashup (FM128) - Sock Monkey Halloween

Here's an early Tuesday post...


Tomorrow I have to give my presentation to my class. It has been a very long time (6 years or so) since I have had to get in front of a group of people and talk. I hope I can slow myself down and talk calmly or our presentation will not be long enough. 

After seeing what Friday Mashup was doing for their challenge this week I realized I have very little fall stampsets. In fact I have only two; Lovely as  Tree and Magnificent Maple (from the current Holiday catalog). For their challenge this week I had to go into my retired stamps and this is as close to a Paper Piecing harvest stampset I had. I love this technique but depending on how detailed your stamp is it can take you a while. 

Here's your Mashup Challenge:
  1. Create a project with a "Fall/Harvest Food Theme (Preserves, Apples, Pumpkins etc.)."
  2. Create a project using "Paper Piecing."
  3. Or Mash it Up and create a "Fall Food themed project with some Paper Piecing "


In order to paper piece the sock monkey I stamped him once on each of the following cardstocks; Smoky Slate (already stamped with the canvas background stamp in Smoky Slate), Real Red, Whisper White. I also did the same thing for the Pumpkin on; Pumpkin Pie, Old Olive, Baked Brown Sugar.

Then I cut out the full Smoky Slate monkey and Pumpkin Pie Pumpkin. Then you cut out your smaller pieces in Real Red, Whisper White, Old Olive and Baked Brown Sugar and I glued them on top of the full cut out image of the Monkey and Pumpkin. 

One trick is to make sure you are cutting right on the outside line of the stamped image. This way your lines will still appear on your smaller pieces.


Stampset: Seasonal Sayings, Sock Monkey (Retired), Canvas Background (Retired)
Paper: Smoky Slate, Basic Grey, Whisper White, Pumpkin Pie, Old Olive, Baked Brown Sugar, Real Red, Polka Dot Parade DSP
Ink: Smoky Slate, Black Staz on
Markers: Basic Black, Pumpkin Pie, Baked Brown Sugar
Bigshot: Magnetic Platform, Squared Collection Framelits
Tools: Paper Snips
Accessories: Basic Grey Corduroy Buttons (Retired)

Your Amazing

After a crazy busy weekend of trying to put together a presentation for my upcoming class on Tuesday I have to say my partner Casey is Amazing!!

He allowed me to focus on my school work and took care of the grocery shopping, yard work and dinner all weekend!!! I truly love him and I am so grateful to have him in my life. I hope you all have someone as equally as wonderful in your life!


Stampset: Your Amazing
Paper: Soft Sky, Basic Grey, Whisper White, Cherry Cobbler
Markers: Basic Grey, Island Indigo, Cherry Cobbler
Bigshot: Magnetic Platform, Apothecary Accents, Argyle Embossing Folder

In order to create the border for the cut out Apothecary Accent stamped image you need to cut out two more of the same shape in the color you would like for the border (I did my in Cherry Cobbler. 

Cut one in half, one horizontally the other vertically. Trim the one you cut vertically to look like it is shown in the first photo. Adhere you pieces so they peak out the sides of your stamped image. Do the same for your other two pieces.

I hope my directions and pictures help to make this technique easier for you to understand.

For me adding the border is simple but it does make a big difference on this card.


Sunday, September 22, 2013

FMS104 Halloween Washi Again!!!...

I apologizing for not posting on Friday! I started going back to University on Tuesday and the homework has already been piled on. I am trying to keep my head above water but that meant I had to stop blogging for a couple days. I will do my best to keep you motivated daily with a new creation.

Onto my latest creation. I am not sure why but I keep going back to making my own DSP with washi tape. It might be because I do not have any Haloween DSP but I am not sure.


As always, I love the sketch at Freshly Made Sketches and found this card to come fairly easily (easy for me is a couple hours in the craft room while watching netflix....)


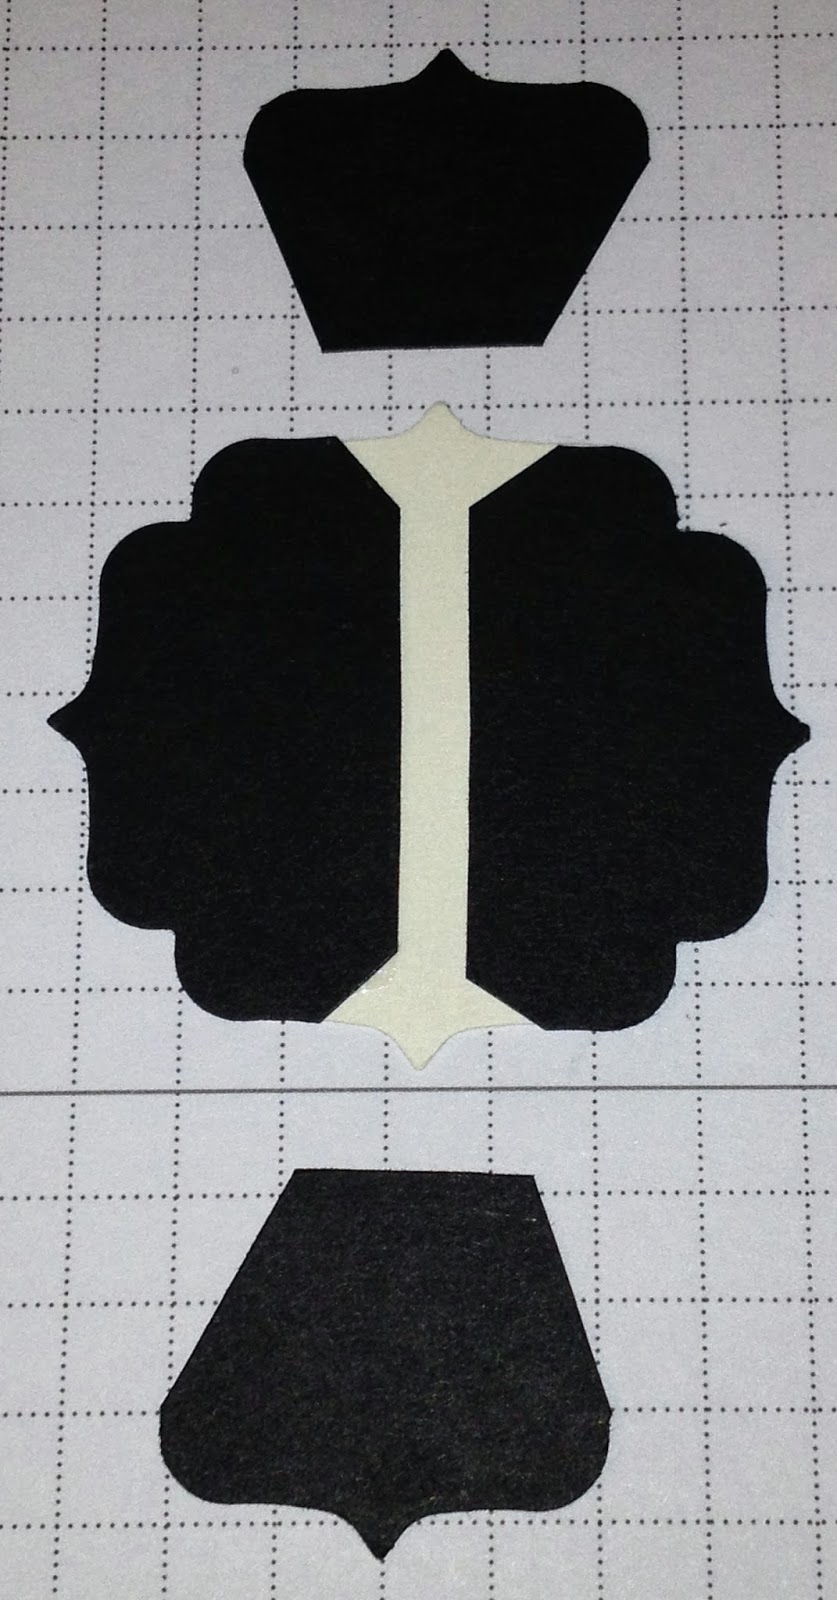
Continue to scroll through my post for photos on how to give you the black highlight around the stamped image.


Stampset: Tags 4 You
Paper: Basic Grey, Very Vanilla, Basic Black, Pumpkin Pie
Ink: Pumpkin Pie, Basic Grey, Basic Black
Punches: Label Bracket
Bigshot: Chevron Embossing Folder
Accessories: Witches Brew Designer Washi Tape, 1/8" Mini Brads


Cut both pieces in half  and also cut along the dotted lines as pictured above.

I forgot to mention to also cut the small corners as shown by the white lines.

Adhere two pieces to the back of your stamped and punched image spacing out the pieces. Do the same for the other two pieces.

The back of your stamped and punched image should look like this.